 Do you feel dehydrated while going for long hiking, walks, or mountain climbing?
Or your backpack doesn’t have a capacity for having a separate bottle of water to give you some cold sips over your tough journeys? Of course, we can all imagine and find ourselves in these kinds of difficulties. But what if there is a unique solution for dealing with your dehydration problems over your long and rugged journeys?
Yes, there it is and it is to have a hydration bladder in your backpack. However, a thing that could be a little worrisome for you is to find how to install hydration bladder in backpack and if I am not wrong then you might definitely be looking for the same query. Pretty right isn’t it?
Related: How To Attach Backpack To Rolling Suitcase? A Complete Guide
Moreover, you might also be planning for an excursion trip and you feel like you should have a regular hydration bladder in your backpack for making you feel comfortable with fresh water. Well, you should and if you do then you are welcome to this ultimate guide. Today, I will let you know about these hydration bladders, why you need them, and how to install them in your backpacks.
So, get set ready and let’s start it.
What Are Hydration Bladders And How They Work?
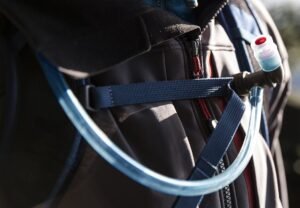
Basically, it is a small bag which is made up of flexible plastic or rubber and it can be used with your backpack for having a great amount of water in it. It is also called a hydration system. Its reservoir has a capped mouth that can be filled with liquid or water, and there is a hose that allows you to drink from it easily. You can fill it up with your favorite juices, sodas, or most of the time water for making yourself worries-free and hassle-free from drinking water from the bottle.
But where exactly to find them and what things you should consider before buying?
Do not worry as they are available in different sizes and with different water holding capacities and you can easily get your one from an online platform like Amazon or Walmart. Moreover, you can also buy your hydration bladder from your local store in case you want to install a hydration bladder in your backpack.
However, there are some important things that you need to consider before buying a hydration bladder that should be according to your needs and must be a versatile and durable one. Let me tell you about them in brief detail.
- Superb quality—Look for a hydration bladder that must verify every single factor of being a great quality product as only this one will be long lasting and versatile for your backpack installation.
- Capacity— This thing matters a lot as you might be somewhere in the world where you may face less availability of water. So, you need to look for a hydration bladder that must be capable of storing a reasonable amount of water so that you won’t feel thirst.
- Drink and refilling level— The hydration bladder must also be perfect in supplying a good sip of water whenever you drink from its pipe and it must also be the one that can be refilled easily. Of course, versatility matters a lot.
- Easily cleanable—looking for the one that can be cleaned easily would be a better choice to make. As, by this, you’d easily be able to clean it and save your pure water from germs.
- Size— This thing is very important to consider. Go for a hydration bladder that can be easily fitted inside the pocket of your backpack. For this, the bladder must be a pocket-sized one. So, when you will get this, it will be easy for you to install it in your backpack.
Why Should You Have A Hydration Bladder In Your Backpack?
The most frequent question that somebody can ask is why would anybody have a hydration bladder installed in his backpack? So, the answer is simple, for making your journeys easier. Suppose you are going to run a marathon next week or planning a hiking trip or maybe you wanna climb Mount Everest this time. This might sound insane to you. But yes, you can do these things if you are that great explorer and always stay on exploring this planet Earth. Also, you know that your backpack will always be with you right? And you can also imagine that you’ll feel thirst over these difficult and life-changing journeys.
Read also: How To Attach Backpack To Rolling Suitcase? A Complete Guide
But instead of stopping, picking your bottle of water from your backpack, or asking someone else to give you some water, what would be better than these things? Of course, a hydration bladder is installed in your backpack. Because you won’t be needed any of the above things as you can drink water any time anywhere without feeling a hinge to stop your journey. The water will come through a hydration bladder with the help of a pipe directly to your mouth and you’ll feel hydrated and again energetic to proceed further.
Moreover, a hydration bladder gives you some on the go benefits that are listed as:
- It gives you an alternative for using it as a hand free.
- It is very easy to use and it is very easy to fill or drink water from it.
- It keeps you hydrated even when you are climbing mountains, doing hiking, or running some kind of race
- These hydration bladders are medically proven and tested. They are free from germs and bacteria. Also, help you for having pure water with you even if its too far from home.
- Most of the hydration bladders can store up to a 2-liter amount of water which is a good sign for having extra water with you.
- Moreover, they can easily make themselves home with your backpack.
So, How To Install Hydration Bladder In Backpack?
As far as our topic is concerned, so let’s get straight to it. You may have your new backpack for using or you can bring that old one by putting the dust away from it and making it ready to go with you. A hydration bladder can help you in a nonstop enjoyment while being on your trek trip because you’d need a bottle, help or to feel dehydrated. So, here is a step-by-step procedure for how to install a hydration blender in a backpack. Let’s have a look at these brief ways of making things possible.
Once you have done testing, you are all set to go. You have successfully installed a hydration bladder in your backpack and now you are free from being dehydrated over your long trip to the mountains.Locate the place in your backpack where you want to install it:
Fixing process:
Test your hydration bladder:
How To Take Care Of Your Hydration Bladder?
As you have bought a new hydration bladder and installed it in your backpack, you also need to consider its proper taking care. But how will you do this? Don’t worry as you won’t have to do much.
Proper Rinsing—You need to do a proper rinsing of your hydration bladder after every time you use it. Use some plain or mild soap mixed water for cleaning every part including pipe, hose, and the bladder itself. This will prevent germs and bacteria and make sure a pure supply of water.
Proper Drying— Once you have rinsed it, leave it in the sunlight or in a natural environment for getting dry. Hang it with something while its cap must be opened and the mouth side must be downward. The water will move from it and it will be free from bacterium or creep
Conclusion
Since you have learned how to install hydration bladder in backpack so I think now you will have no worries about being dehydrated. Also, you won’t have to do a handful of exercise of drinking water after picking a water bottle from your backpack. Moreover, if you don’t wanna go for installation, there are many backpacks available out there that already have a hydration bladder installed in them.
So, you can consider them too. Anyway, if you have any queries to ask or want to suggest something, reach me out through the comments as I am all here to reply to your meaningful conversations. Take care of yourself and keep drinking water from a hydration bladder installed in your backpack over your long journeys. See you soon with another big idea.
Cheers.